Many Online Business Managers (OBMs) use ClickUp not only to manage their own businesses and teams but also to manage their clients’ businesses.
It’s a great tool to use to not only keep track of your own internal business tasks but also to manage your client work. This article will focus on how OBMs can use ClickUp for internal business and team management.
The ClickUp Hierarchy
Our first priority is to build a functional workspace structure. This is a crucial task as you need a good workspace structure to be streamlined, organized, productive, and to use custom fields efficiently and native automation to its fullest potential.
When designing your workspace, you should consider your business structure, services, and delivery method. You also want to try to think ahead – what sort of things may you want to automate in the future. Since you cannot set automations at the everything level, you’ll want to make sure that your workspace is designed for maximum efficiency.
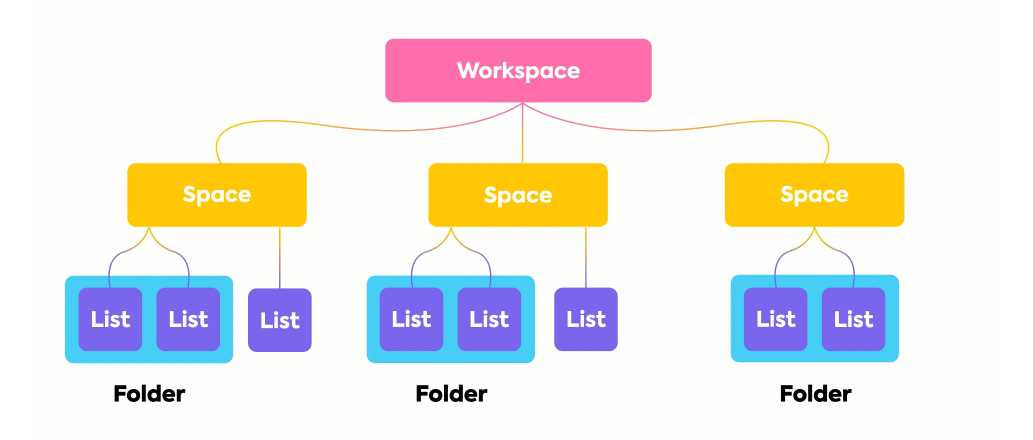
Think of your workspace as your filing cabinet – you’ll have one workspace for your business. Inside your workspace, you can create spaces for the different departments in your business. Each space can have its own settings, workflows, automations, custom fields, and be shared with the relevant team members.

ClickUp is a great tool to use to not only keep track of your own internal business tasks but also to manage your client work.
To start, I recommend one Business Headquarters Space to organize all your internal business tasks and one Client Management Space to manage your client work in ClickUp as an OBM. Inside of your spaces, you can organize your lists of tasks with folders. The lists contain your action items – your tasks. If you have a productized service, you may want to choose a different structure. This will be addressed in a future post.
There are two basic structures every OBM will need to set up inside their ClickUp to manage their projects
- Client Management space
- Business HQ space
Let us break down what each of these spaces and the structures inside them looks like.
Create Two Workspaces
A basic Workspace structure can help you manage all of your projects especially when clients with projects of varying sizes. A solid and organized structure in ClickUp for OBMs is key as this helps you have clear control of all of your projects together on one platform, without it being chaotic or overwhelming, and gives you the opportunity to create saved views at the everything level or dashboards so that you can get a birds eye view of your client work.
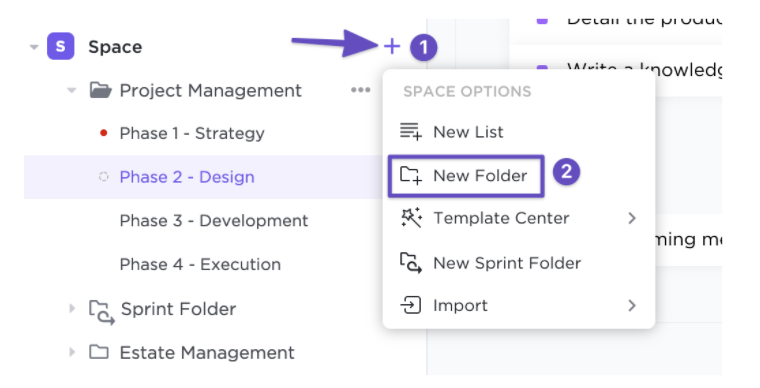
Create a separate space for client management – but not separate spaces for each client. Note that only the workspace owner, admins, and members can have access to the space level. Then create separate folders for each client.

Inside each folder, you can add specific lists for every project you work on. You can share access to this list with your clients, their VAs, or anybody else on their team or your own team at the folder level and the list level as guests.
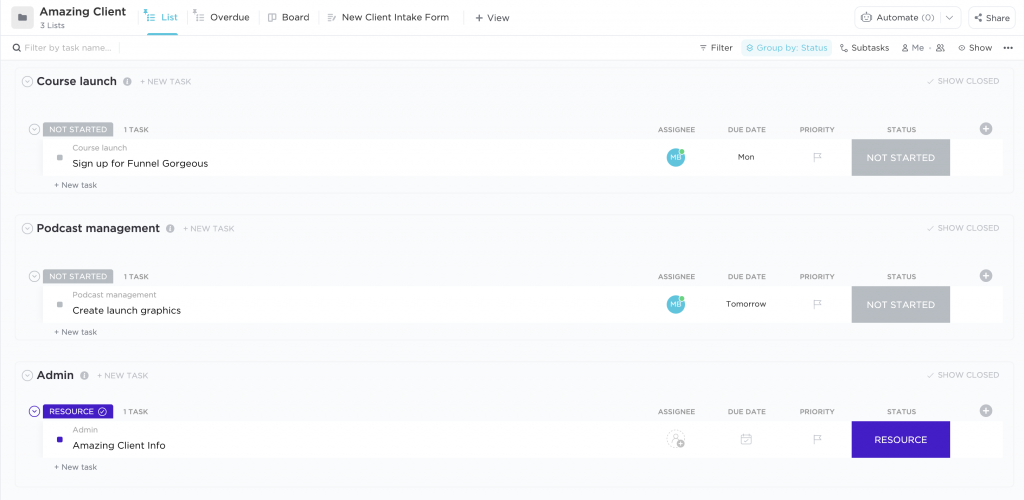
In your lists, you can add tasks which are the action items for the specific projects. For example, let’s take Client A. Say you are helping them with launching a course. This would be a one-time project based service. You also help them manage their podcast. This would be an on-going task. You can either create a list for each of these services or create one list and use a dropdown custom field to differentiate between the two services. I also recommend creating an administrative list where you keep track of invoice dates if you send them manually, contract expiry dates, and other important client info. And now, with email right inside of ClickUp, you can consolidate your communication with your client into one task.

Make sure you create a basic client folder template which you can save in the template center and create and edit for each new client.
Don’t Create One Space Per Client
As a vetted ClickUp Consultant, a mistake that I see my clients make often is setting up one space per client. While this may work if you only have a few clients, it’s not scalable for several reasons.
- There is no way to collapse all the spaces and eventually as you grow you’ll be scrolling and scrolling to get to the space you need. Some of my clients have 200-500 clients and this is not an efficient way to work.
- It doesn’t allow for consistency and streamlining across your clients. You cannot set automation at the everything level so it would be tedious to do so in every space. If you have your clients set up as folders, you can have your automation at the space level so they’ll apply to all your client folders.
- It makes it hard to get a good overview of all your client work. When your clients are all in one space, it’s easier to be consistent with statuses and custom fields and helps you get great reports in the dashboards.
- It becomes cumbersome to change spaces as the browser extension makes it really difficult.
You need a good workspace structure to be streamlined, organized, productive and to use custom fields efficiently.
Business Headquarters Space
1. Folder: Business Hub
Insider your Business HQ Space, arrange your tasks into folders and lists . Don’t make a list or folder for each team member. It is more important to arrange your tasks according to what the task relates to, how the task works within your business and your overall processes than the assignee. For example, you may have some of these lists:
- List: Administrative tasks
- List: Financial tasks
- List: Personal development
- List: Business Hub: Brand dossier: branding info, services, bio
Avoid creating different folders or lists for different team members. Instead, use the filters and group by assignee to look at how your team is working. There are also more advanced features which you may want to explore like the box view and workload view. You can also create a saved view grouped by an assignee to see everyone’s work. You can also create a team management dashboard which will be discussed in a future post.
When working, the team members can use Me Mode which will show only their tasks. Also, they can look at their Home to see their pending tasks.
By creating project-based lists, you’ll be able to stay on top of the project’s progress.
2. Lead Tracking
Here, you can keep track of the leads that are coming in and the ones you are already working on. All the project proposals and contracts would come under here. You can also see the pending tasks, who you need to follow up on, and essentially what is next.
3. Marketing
Here is where you manage your social media posts, blog posts, newsletters, subscriptions, and other general marketing tasks like website updates, ad campaigns, etc.
Delegating To Your Team
Save yourself money and when adding a team member to ClickUp, consider what role they need. If you have a VA or use subcontractors, they probably don’t need to be paid members. You can always use your guest spots for them. Remember that you have the ability to allow guests to create and edit items with the four different levels of guest permission. Here is more info about roles in ClickUp.

It is important to remember that guests cannot have space-level access, but since your clients are at the folder level, it’s easy to give your team members access to the whole folder if you prefer. To share a folder with a team member, click on the … at the folder level to access the Folder Settings and go to Sharing & Permissions.
Note that there are 4 different types of guest permissions. Choose the one that is most appropriate for your needs. Remember, you can always adjust it if you need to. If you go to Settings > People you can check out many guest seats that are available.
To See an Overview Of Your Team
At the space or the everything level, you can create a personalized inbox by setting up saved and pinned filtered views. You may wish to create the following views in either the list, board, or table view:
- All tasks due this week grouped by assignee
- All overdue tasks grouped by assignee
- All completed tasks grouped by assignee
You can also use the dashboard widgets to get an overview of your team. The dashboard widgets make your work even simpler by showing you what things look like, where the tasks are, what is pending with whom, where the bottlenecks are, etc.
I will talk more about using dashboards in an upcoming blog post.
Working in Your ClickUp and Your Clients’ ClickUp
It can get a little overwhelming when you’re managing your own team in ClickUp – and working in other ClickUp workspaces as well. Here are a few tips on making this easier:
- Adjust your notifications in each workspace so you’re not bombarded with notifications from multiple workspaces.
- Keep the daily email digest on for each workspace and use that to guide your daily work
- Check your Home in each workspace.
- In the settings menu, pay attention to the notification indicators – a small blue dot means you’ve got a notification in that workspace.
- Some people use Integromat to set up a scenario where all their tasks are being sent to one workspace so that’s an option as well.
- Decide how you’re going to keep track of your tasks that are related to other workspaces – will you keep all the tasks in your workspace? Will you have a list with your tasks in each of the other workspaces? Will you have a dashboard? Pick one method and stick to it until ClickUp releases an update which will make this easier.
Standard Operating Procedures in ClickUp for OBMs
A common use of ClickUp is creating or updating standard operating procedures (SOPs). Get a head start on your SOP creation with my popular 90 Day SOP Planning Template for ClickUp. Learn more here.


